|
Bill - Enter Current Billings |

|

|

|
|
Bill - Enter Current Billings |
|
|
|
A. Getting Started This is a DATA ENTRY PROGRAM
On the A/R and Billing / Miscellaneous Billing Menu
select #2 - Enter Current Billings.
You will see an Input Screen with EMPTY BOXES. (The file was emptied when
you did the last Billing Print & Update).
If you see a filled in record on the screen, it means that:
A. Some entries for this Billing Input Run were made at an earlier time.
(Click on Switch to ADD button to bring up an EMPTY Input Screen)
OR:
B. The LAST BILLING INPUT RUN was NOT updated.
Verify that these are the last Billing Input Run's valid entries, then Update & return)
B. Body of Billing Record.
1. Enter Customer Code REQUIRED ENTRY
Enter a VALID Customer Code, then Click on Job Code or Press TAB key.
If the Code you entered was INVALID you will see the SCAN FOR WINDOW where
you can search for the Correct Code.
If you are not sure of the Customer Code, enter the FIRST LETTER of the FIRST NAME.
Then Press TAB key to bring up SCAN FOR WINDOW.
If the Customer Name is NOT IN THE LIST, you can ADD A NEW CUSTOMER by
clicking on the WINDOWS MENU BAR.
2. Enter Job Code (if this Billing pertains to a Job)
Enter a VALID Job Code, then Click on Invoice # or Press TAB key.
If the Code you entered was INVALID you will see the SCAN FOR WINDOW where
you can search for the Correct Code.
If you are not sure of the Job Code, enter the FIRST LETTER (usually indicates
type of Job) Then Press TAB key to bring up SCAN FOR WINDOW.
If the Job Name is NOT IN THE LIST, you can ADD A NEW JOB by clicking on the
WINDOWS MENU BAR ,then clicking on the JOBS selection.
3. Invoice Number (Optional Entry)
Normally this field is left BLANK, and the Invoice Number is added to the Record when
PRINT BILLINGS is run. If you need a SPECIAL INVOICE NUMBER enter it here. Any
entry here will OVERRIDE the Invoice Number ASSIGNMENT in PRINT BILLINGS.
Alphanumeric field of up to 10 characters.
This entry is part of the ACCESS CODE that you may later use to FIND this Invoice in the
file or on a Report. Normally you would use a UNIQUE INVOICE NUMBER that you
assigned to this document.
4. Override Invoice Date
You will have an opportunity to enter an INVOICE DATE for this ENTIRE BATCH of
of Billing Entries in the next step, Print Billings.
If you want to OVERRIDE this BATCH INVOICE DATE and post this Invoice with a
DIFFERENT Invoice Date, enter that Invoice Date in this Input Box.
5.Override Due Date
You will have an opportunity to enter a DUE DATE for this ENTIRE BATCH of
of Billing Entries in the next step, Print Billings.
If you want to OVERRIDE this BATCH DUE DATE and post this Invoice with a
DIFFERENT Due Date, enter that Due Date in this Input Box.
6. Customer Reference
Input Box for CUSTOMER PURCHASE ORDER or other CUSTOMER REFERENCE
Notation.
7. Override LOCATION
If this Invoice is for work performed at a DIFFERENT SALES LOCATION
than the one setup in the Job Master Record or the Default Location
enter an OVERRIDE SALES LOCATION.
8. Type of Transaction REQUIRED ENTRY
TYPE OF TRANSACTION determines the General Ledger SALES, ACCOUNTS RECEIVABLE
and OTHER ACCOUNTS that will be posted for this Billing Entry.
Click on the down arrow and select the Type that fits this entry.
If there is no type in the List Box that fits this entry you can ADD a New Type of
Transaction by Clicking on the Windows Menu Bar at top left, then Click on Sales
Transaction Codes.
9. Override CUSTOMER TERMS
To OVERRIDE the CUSTOMER TERMS OF PAYMENT entered in the Customer's Master
Record, Click on this Drop Down List Box and select TERMS from the List.
10. Override CUSTOMER NAME & ADDRESS
CUSTOMER NAME & ADDRESS are filled in AUTOMATICALLY after the CUSTOMER CODE
is entered. Information comes from the Customer Master Record. Click on any of these
Input Boxes to make a TEMPORARY CHANGE for THIS BILLING ONLY. Changes here
will NOT AFFECT the Customer Master Record.
11. Override FOR (Job Name & Address)
JOB NAME & ADDRESS are filled in AUTOMATICALLY after the JOB CODE
is entered. Information comes from the Job Master Record. Click on any of these
Input Boxes to make a TEMPORARY CHANGE for THIS BILLING ONLY. Changes here
will NOT AFFECT the Job Master Record.
12. SERVICE DATE
Input Box for SERVICE DATE if desired to Print on Billing. Not used elsewhere.
13. DISCOUNT AMOUNT
Input Box for DISCOUNT AMOUNT. If used, it will Print on the Billing and Subtract from
Net Amount Due. Discount Amount is not used elsewhere. IF DISCOUNT IS TAKEN
it is entered when PAYMENT IS POSTED.
C. LINE ITEM ENTRY
1. Display Grid
The Display Grid below shows Line Items as they are entered. Use this Grid to ACCESS a
previously entered Line Item to CHANGE or DELETE it.
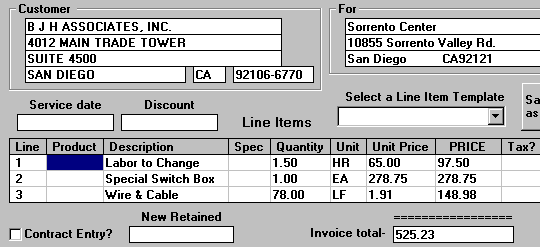
Click on Line 1,2 or 3 to bring an existing Line Item up in the ENTER ITEMS Window.
Click on the GRID DOWN ARROW at far right (not shown) to bring up an EMPTY LINE ITEM,
then Click on it to bring up an Empty Enter Line Item Window for entering a NEW RECORD:
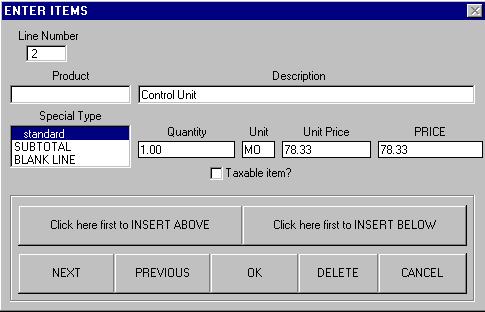
Click on the above BOXES and BUTTONS for explanations on HOW TO USE
this LINE ITEM ENTRY WINDOW.
(Note - CONTRACT ENTRY and NEW RETAINED are explained under CONTRACT ENTRY Topic).
D. USING TEMPLATES
Templates allow you to SAVE and RECALL Line Items which are COMMONLY or
FREQUENTLY USED. Their Purpose is to REDUCE KEYED INPUT, saving time and
errors. Any LINE ITEM or SET OF LINE ITEMS can be saved as a TEMPLATE by Clicking
the Save Line Items as a Template button at the center right of the Screen. This causes
the Template Window below to appear:
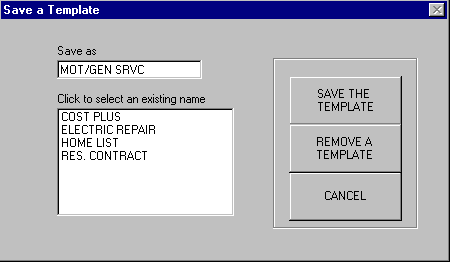
After keying in the LINE ITEMS we wanted to SAVE AS A TEMPLATE we Clicked that
button and the above Window appeared.
Next, we keyed in a NAME for the TEMPLATE in the SAVE AS Input Box. After Clicking
the SAVE THE TEMPLATE button those Line Items will be added to our List of Templates,
available for Recall by using the above Name.
The REMOVE A TEMPLATE button allows us to Click on a Template Name we don't use
any more, then Click this button to REMOVE THOSE LINE ITEMS from our Template File
-------------------------------------------------------------------------------------------------------------------------
TO RECALL A TEMPLATE use the Select a Line Item Template Drop Down List Box at right
of Screen above the Line Item Display Grid, as in the below example:
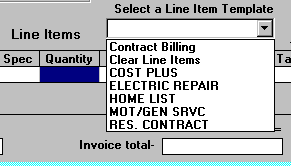
To bring the Line Items from the Template into the Display Grid, just Click on the Template
Name in the Drop Down List Box. The Line Items can then be EDITED as required..
E. VERIFY TOTAL INVOICE AMOUNT
See that the TOTAL DISPLAYED in the INVOICE TOTAL BOX at the bottom of the Price
Column MATCHES the TOTAL on your Source Document.

