|
Bill - Print Billings |

|

|

|
|
Bill - Print Billings |
|
|
|
On the A/R and Billing / Miscellaneous Billing Menu
select #3 - Print Billings.
A. Enter Parameters
1. Enter DEFAULT INVOICE DATE (Activity Date) (Required)
This is the INVOICE DATE that will print on ALL BILLINGS in this run EXCEPT those
that had OVERRIDE INVOICE DATES entered in the Billing Record.
You CANNOT enter a Date in a CLOSED MONTH as this INVOICE DATE also becomes
the ACTIVITY or ENTRY Date for the ACCOUNTS RECEIVABLE INPUT RECORD that is
created during the UPDATE process.
2. Enter DEFAULT DUE DATE (Required)
This is the DUE DATE that will print on ALL BILLINGS in this run EXCEPT those
that had OVERRIDE DUE DATES entered in the Billing Record.
You CANNOT enter a Date in a CLOSED MONTH as this DUE DATE also becomes
the Due Date for the ACCOUNTS RECEIVABLE INPUT RECORD that is created during
the UPDATE process.
3. NEW FIRST INVOICE NUMBER
The next UNUSED INVOICE NUMBER will appear in this Input Box. It is generated from the
LAST INVOICE NUMBER USED which is stored in the INVOICE PRINT PARAMETERS (see
below). This number can be OVERRIDDEN by keyed entry.
Each Invoice printed will increment this number by one, EXCEPT Billing Input Records
that have an INVOICE NUMBER in the Input Record.
4. Windows Menu Selections
Click on this Menu at upper left if you need to CHANGE A SALES LOCATION MASTER RECORD,
or ALTER the Printing Characteristics of the Billing.
Click on the SALES LOCATIONS CODES Menu Selection to bring up the Customer Master File to
alter the Sales Location Master Record.
Click on Invoice Print Parameters to bring up the Print Control Window below:
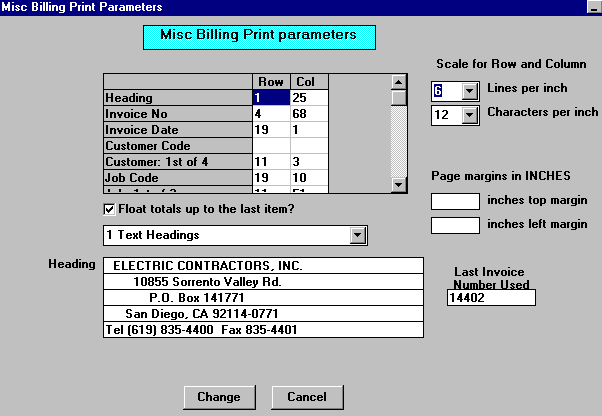
The ROW / COLUMN Grid at top center determines the STARTING PRINT POSITION of
all Sections of the Billing. Click on an Item to bring up a CHANGE WINDOW and enter
new positions as required.
The SCALES at right top are Drop Down List Boxes that contain choices of 6 or 8 Lines per Inch
for Vertical Spacing and 10 or 12 Character per Inch for Horizontal Spacing.
Below those are Input Boxes for Margin Sizes in Inches an fractions thereof.
The Float totals up to the last item Check Box will OVERRIDE the Totals Line positioning
in the Grid Display, and move the Totals and Aging up to a Position JUST BELOW the LAST
LINE PRINTED.
The contents of the Heading Boxes appear at the top center of each Billing
Last Invoice Number Used is stored for use in the NEXT BILLING RUN to generate the
FIRST INVOICE NUMBER..
The Headings Drop Down List Box has the following Options:
No text Headings - Used ONLY with PRE-PRINTED FORMS
Text Headings - DEFAULT. Prints Text Headings for all Fields.
Text Headings and Underline - Prints UNDERSCORES under each Heading
No text of any kind - Same as top selection except no descriptors.
B. Select Print Option Note: Click on FILES at top left for Printer / Font Setup
Use the buttons in the box at bottom to select Print Destination.
You can use the Start: PDF/Preview Button to print to PDF.
Notes on printing to PDF:
| • | Gives you a preview of the entire invoice run in Adobe Reader. |
| • | Provides the capability to print an attractive invoice form as shown below, without having to purchase special forms. |
| • | The PDF file is created in the <Accounting System Root>\data\Documents folder (for instance, "c:\AW7\data\Documents") with the name "Invoices_YYYYMMDD.pdf", where YYYY is the 4-digit year, MM is the month and DD is the day. |
| • | You can also create your own logo to print in the header. |
| • | Your logo image file should be 200dpi, either jpeg or png format, with a maximum size of 290 pixels high by 550 pixels wide. |
| • | We recommend that the logo image file be stored in the <Accounting System Root> folder with the name "invlogo.jpg". It can be named anything you like, but a minor configuration change would have to be made to accommodate that. |
| • | The PDF files are searchable. |
| • | In fact, the entire folder wherever they are stored, is searchable by Adobe Reader, allowing you to look up specific invoices by customer, date, or invoice number. This gives you quick access to invoice history and saves tons of filing space. |
| • | You would be able to store almost 400 million invoices (we hope you have that many!) on one 500 gigabyte disk drive costing less than $100. |
After Clicking Start: Print, the FIRST BILLING will print and the Test Print Control Panel will appear. This method of printing will print plain text invoices, in case you have pre-printed forms.
Use Exit to Return to the Menu without printing the Statements.

Sample Invoice Page 1, PDF Format (Print to Screen Option)

Sample Invoice Page 2, PDF Format (Print to Screen Option)
C. UPDATE ACCOUNTS RECEIVABLE INVOICE INPUT FILE and JOB COST
After Printing you will see a MESSAGE BOX with an OPTION TO UPDATE THIS APPLICATION.
Click on Yes if this is a FINAL PRINTING of an ACCEPTED BILLING. Both the ACCOUNTS
RECEIVABLE INPUT FILE and JOB COST will be UPDATED, and a Message Box will CONFIRM
this.
D. Print an A/R Invoice Register and Update the Open Accounts Receivable File (optional)
After entering and updating BILLINGS in a run, you will see an Option to do the PRINT AND UPDATE INVOICES step to post the AIA Billings to the Open Accounts Receivable File.

