|
A/P - Inv - Enter Invoices |

|

|

|
|
A/P - Inv - Enter Invoices |
|
|
|
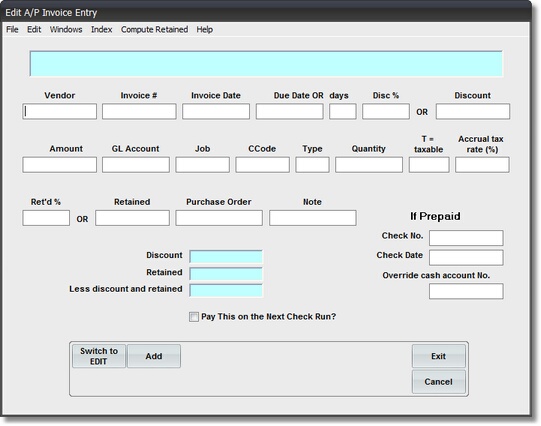
A. Getting Started This is a DATA ENTRY PROGRAM
On the Accounts Payable / A/P Invoice Entry Menu select #1 - Enter Unpaid / Prepaid Invoices.
You will see an Input Screen with EMPTY BOXES. (The file was emptied when you did the last A/P Input Update).
If you see a filled in record on the screen, it means that:
A. Some entries for this A/P Input Run were made at an earlier time.
(Click on Switch to ADD button to bring up an EMPTY Input Screen)
OR:
B. The LAST A/P INPUT RUN was NOT updated.
Verify that these are the last A/P Input Run's valid entries, then Update & return)
SPECIAL NOTE: Two new features have been added to this program. Click on below items for more information:
1. A/P Recurring Invoices (a quarterly & monthly file of repetitative Invoices)
2. A/P Input INDEX (ability to change DISPLAY ORDER of Entered Invoices)
B. Routine Entries
1. Enter Vendor Code REQUIRED ENTRY
Enter a VALID Vendor Code, then Click on Job Code or Press TAB key.
You will see the VENDOR NAME displayed in the VERIFICATION WINDOW.
If you are not sure of the Vendor Code, enter the FIRST LETTER of the FIRST NAME.
Then Press TAB key to bring up SCAN FOR WINDOW.
If the Vendor Name is NOT IN THE LIST, you can ADD A NEW VENDOR by clicking on the WINDOWS MENU BAR.
2. Invoice Number
Alphanumeric field of up to 10 characters.
This entry is part of the ACCESS CODE that you may later use to FIND this Invoice in the file or on a Report. Normally you would use the UNIQUE INVOICE NUMBER that the Vendor assigned to this document. In special cases you may enter NOTES in this field. If you leave it BLANK, the program will automatically fill in the Invoice Date in this field.
3. Invoice Date REQUIRED ENTRY
Invoice Date is also part of the ACCESS CODE, and must be KEYED IN. Usually the Vendor will assign an Invoice Date and print it on the Invoice. If there is not one on the Invoice, key in the Current Date.
Note - If you enter an Invoice with VENDOR CODE, INVOICE # and INVOICE DATE that MATCH one previously entered, you will get a Message Box WARNING. If the Invoice Date you entered EXCEEDS the LIABILITY INSURANCE EXPIRATION DATE in this Vendor's Master Record, you will get a Message Box WARNING.
4. Due Date or Days
Due Date usually follows the TERMS printed on the Invoice. You may enter a SPECIFIC DATE in the DUE DATE field or the NUMBER OF DAYS FROM INVOICE DATE in the DAYS field. In the latter case, after you pass to the next field, the DUE DATE will be computed and appear in the DUE DATE field.
The DAYS field will be emptied.
Due Date is used to AGE an Invoice on the AGED ACCOUNTS PAYABLE REPORT. It is also used to ALLOW or DISALLOW DISCOUNTS based on a comparison with the Current Date.
If you leave this field BLANK, the INVOICE DATE will automatically be entered here.
5. Enter Discount % or Discount Amount (If Invoice is DISCOUNTED)
2 digit DISCOUNT PERCENTAGE field used to enter a % UP TO 10%
For a 2% discount enter 2 in Disc % (no decimal required)
or
Use DISCOUNT AMOUNT field at right to enter a DISCOUNT AMOUNT.
For a $3.00 discount enter 3.00 in Discount Amount.
6. Enter GROSS AMOUNT of Invoice. REQUIRED ENTRY
Gross Amount of Invoice is Total Amount of Invoice BEFORE Discount or Retainage is deducted.
7. Enter General Ledger Account Number. REQUIRED ENTRY
Note: After entering Gross Amount above, and moving to this field, the STANDARD G/L ACCOUNT will be loaded from the Vendor Master File. If this is the Account you want to use, move to the next entry field.
otherwise, remove this Account # and:
Enter a VALID Account Code, then Click on Code or Press TAB key. You will see the ACCOUNT NAME displayed in the VERIFICATION WINDOW.
If you are not sure of the Account Code, enter the FIRST DIGIT (to get to the correct Chart of Accounts section, then Press TAB key to bring up SCAN FOR WINDOW.
If the G/L Account is NOT IN THE LIST, you can ADD A NEW ACCOUNT by Canceling out of the Distribution Window & clicking on the WINDOWS MENU BAR.
Click on ACCOUNTS, then do ADD A NEW ACCOUNT procedure.
8. Enter Job Code (if this Invoice is to be posted to Job Cost)
Enter a VALID Job Code, then Click on Cost Code or Press TAB key.
You will see the Job NAME displayed in the VERIFICATION WINDOW.
If you are not sure of the Job Code, enter the FIRST LETTER (usually indicates type of Job) Then Press TAB key to bring up SCAN FOR WINDOW.
If the Job Name is NOT IN THE LIST, you can ADD A NEW JOB by clicking on the WINDOWS MENU BAR ,then clicking on the JOBS selection.
9. Enter Cost Code (if this Invoice is to be posted to Job Cost)
Enter a the Cost Code, then Click on Type Code. or Press TAB key.
You will see the Cost Code NAME displayed in the VERIFICATION WINDOW.
If the Cost Code is NOT VALID, you can use JOB MAINTENANCE to add a Cost Code by clicking on the WINDOWS MENU BAR , then click on JOBS.
Another simpler way to Add a New Cost Code to a Job is to key in the full Cost Code (It must exist in the Master File of Cost Codes). After pressing TAB you will see a Message Box that asks if you want to ADD THIS COST CODE. If you press the YES button the Cost Code will be added & a Message Box will verify it.
10. Select Type Code (if this Invoice is to be posted to Job Cost)
Input Box for JOB COST COLUMN TYPE CODE.
In most cases NO ENTRY will be required in this field, since the VENDOR MASTER RECORD will load a STANDARD TYPE CODE for this Vendor.
In the case where ONE VENDOR may have MULTIPLE Type Code possibilities (they are Material Suppliers AND Subcontractors), you will have to OVERRIDE the Standard Type Code with an entry in this field.
11. Quantity (optional entry)
The ONLY use for this entry is for printing and comparison to Estimate on the JOB COST REPORT: UNIT COSTS.
C. Exception Entries
1. Enter Retainage % or Retainage Amount (If Invoice has RETAINAGE)
2 digit RETAINAGE PERCENTAGE field used to enter a % UP TO 15%
For a 10% discount enter 10 in Ret % (no decimal required)
or
Use RETAINED AMOUNT field at right to enter a RETAINAGE AMOUNT.
For $150.00 retainage enter 150.00 in Retained Amount.
2. Enter Purchase Order Number (If Invoice is to be posted to Purchase Order File)
10 Character ALPHANUMERIC field used IF THIS INVOICE is to be posted to an OPEN PURCHASE ORDER.
JOB CODE entry is REQUIRED for PURCHASE ORDER entry.
If P.O. was set up with a COST CODE SPECIFIED you must also enter the COST CODE .
After entering this field, you will see the PURCHASE ORDER STATUS MESSAGE in the Verification Window.If the Purchase Order amount is EXCEEDED or MATCHED you will get a MESSAGE BOX WARNING.
3. Note
This field can only be used if NO PURCHASE ORDER NUMBER has been entered.
This is a 10 character field for entry of a NOTE that will print IN PLACE OF PURCHASE ORDER NUMBER on all Accounts Payable Reports and VENDOR CHECK.
4. Tax Listing
Check Box for inclusion of Invoice Record on MONTH END TAX LISTING REPORT.
5. Prepaid Check
A PREPAID CHECK is one that has been written manually in the field, or PRIOR to a Regular A/P Check Run.
By entering a CHECK NUMBER and CHECK DATE in these Entry Boxes, the Check Print Program will SKIP these Invoices and NOT PRINT CHECKS for them.
The CHECK NUMBER and CHECK DATE will be posted to all Accounts Payable Records just as if the Check had been written by the System.
THE CHECK DATE CANNOT BE IN A MONTH THAT HAS BEEN CLOSED.
6. Override Cash Account
To be used ONLY for PREPAID CHECKS.
Enter an OVERRIDE CASH ACCOUNT here if you wrote this Check from a CASH ACCOUNT OTHER THAN YOUR REGULAR A/P CASH ACCOUNT.
7. Pay this on the Next Check Run?
Use this CHECK BOX if you want to automatically PAY THIS INVOICE the NEXT TIME CHECKS are run.
D. Verification and Storage
1. Code Verification
You are encouraged to VERIFY EACH CODE that you enter in the VERIFICATION WINDOW the Vendor Name, Job Name, and Account Name and Cost Code Description are all displayed in full. This is the EASIEST place to make a Code Correction
2. Store Record
Click on the ADD Button to Store this Record and bring up an Empty Screen to enter the next Record. After this, if you are finished entering Records Click on EXIT to return to the Menu.

