|
A/P - Inv - Print Input Register & Update |

|

|

|
|
A/P - Inv - Print Input Register & Update |
|
|
|
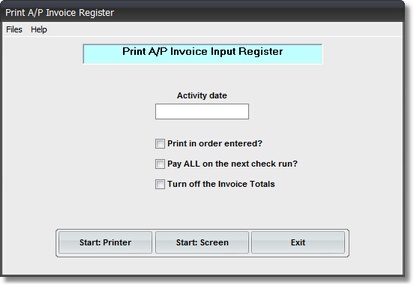
On the Accounts Payable / A/P Invoice Entry Menu select #2 - Print and Update Invoices.
This selection will print the A/P INVOICE INPUT REGISTER.
A. Enter Parameter
1. Enter ACTIVITY DATE.
This date is VERY IMPORTANT. It determines in WHAT MONTH these A/P Invoices
will be POSTED TO THE GENERAL LEDGER. You cannot enter a DATE in a CLOSED
MONTH. If you do you'll get a Message Box WARNING, and be forced to re-enter the
Activity Date.
B. Select Print Option Note: Click on FILES at top left for Printer / Font Setup
Use the buttons in the box at bottom to select Print Destination.
You can use the Start: Screen Button to print to the Screen for a Preliminary Control Total Check, or to to verify an Input Data Correction. BEFORE LEAVING THIS PROGRAM BE SURE to use the Start: Printer Button to a get a printed A/P INVOICE INPUT REGISTER for your AUDIT TRAIL. To do the UPDATE OF DATA FILES you MUST USE the Start Printer Button. After the Report finishes printing you will see the UPDATE SELECTION BOX
pictured below
C. Balance Control Totals.
Use the CONTROL TAPES you made in the PREPARE INVOICES step to balance to the TOTAL MONEY AMOUNTS at the end of this Report.
If the amounts are OUT OF BALANCE compare INVOICES to the Report to find the error.
Return to ENTER INVOICES to correct the mistake. Then repeat this step.
D. Update Accounts Payable and Job Cost.
After the Report has finished printing you will see the UPDATE TOTALS & SELECTION BOX pictured below. Click on Data Windows & Buttons for explanation:
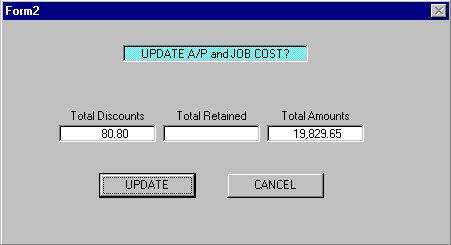
After the files are updated, the A/P Input File is EMPTIED for the next A/P Input Run.
This completes the A/P Input process.

