|
A/P - Pay - Print Check Register |

|

|

|

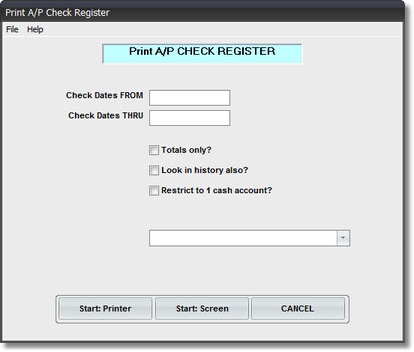
On the Accounts Payable / A/P Payments Menu select #6 - Print a Check Register.
This selection will print the A/P CHECK REGISTER Report.
A. Enter Parameters
1. Enter CHECK DATES FROM. (required)
This date is the START OF THE PERIOD during which A/P PAY CHECK RUNS will be included on this A/P Check Register.
If you enter a DATE in a CLOSED MONTH you'll get a Message Box WARNING. If you do want a Check Register starting in a CLOSED MONTH, BE SURE to CHECK THE HISTORY BOX below so that any Paid Invoice Records moved to History will be included.
2. Enter CHECK DATES THRU. (required)
This date is the END OF THE PERIOD during which A/P PAY CHECK RUNS will be included on this A/P Check Register.
VERIFY BOTH DATES since this Accounting Report is part of your Audit Trail.
3. TOTALS ONLY? Check Box. (Optional)
If you want VENDOR TOTALS ONLY with NO INVOICE DETAIL, Click on this Check Box.
It is recommended that you NOT USE THIS FEATURE for your Final Audit Trail Copy, since you need a listing of WHICH INVOICES WERE PAID.
4. LOOK IN HISTORY ALSO? Check Box. (Optional)
If you are running a Report that includes Pay Runs done during a CLOSED MONTH (You will get a Message Box WARNING about this), then Check this Box to INCLUDE INVOICES that have been MOVED TO THE A/P HISTORY FILE.
NOTE: With this option Checked the Display or Printing of this Report will take SIGNIFICANTLY LONGER since the Entire History File has to be searched.
B. Select Print Option
Note: Click on FILES at top left for Printer / Font Setup
Use the buttons in the box at bottom to select Print Destination.
You can use the Start: Screen Button to print to the Screen for a Display LOOKUP.
(Be sure to do a PRINTED REPORT to get your AUDIT TRAIL Report).
Use the Start: Printer Button to a get a printed A/P CHECK REGISTER.
Use Exit to end the program without printing the Report.