|
A/P - Pay - Apply Manual Payments |

|

|

|
|
A/P - Pay - Apply Manual Payments |
|
|
|
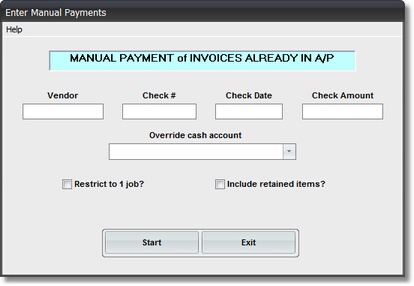
On the A/P Payments Menu select #5 - Apply Manual Checks to OPEN A/P Invoices.
This selection will ALLOW YOU TO UPDATE INVOICES AS PAID WITHOUT WRITING A
CHECK ON THE COMPUTER.
A. Enter Parameters
1. Enter and Verify VENDOR CODE. (required)
Enter a Valid VENDOR CODE for the Vendor to whom you wrote the MANUAL CHECK.
If you are not sure of the Vendor Code, enter the FIRST LETTER of the FIRST NAME.
Then Press TAB key to bring up SCAN FOR WINDOW.
2. Enter and Verify CHECK NUMBER. (required)
Look at the PREPRINTED CHECK NUMBER on the check you wrote to the Vendor.
Enter that Check Number in this Input Box. Then VERIFY it.
3. Enter and Verify CHECK DATE. (required)
This is an IMPORTANT ACCOUNTING DATE. Be sure to VERIFY after entry.
4. Enter and Verify CHECK AMOUNT. (required)
This AMOUNT must EQUAL the INVOICE TOTAL that you.select to be UPDATED AS PAID
by this Manual Check. Be sure to VERIFY after entry.
5. OTHER CASH ACCOUNT Drop Down List Box (optional)
If you want a CASH ACCOUNT OTHER THAN YOUR PRIMARY ONE credited for
this A/P Check Update, Click on the Drop Down List Box and SELECT one of the
OTHER CASH ACCOUNTS listed.
6. Restrict to 1 Job? Check Box and Input Box (optional)
Click on this Check Box if you want to RESTRICT THE INVOICES IN THE GRID DISPLAY
to ONE JOB. After Checking this Box the JOB CODE INPUT BOX appears.
Enter the JOB CODE in this Input Box that you want the Grid Display restricted to.
7. INCLUDE RETAINED ITEMS Check Box - (Optional)
Check this Box if you want RETAINAGE ITEMS included IN THE GRID DISPLAY.
(Default for this Box is NOT CHECKED)
B. Start Selection Option
Click EXIT Button if you want to return to the Menu WITHOUT selecting Invoices.
After clicking START Button you will see the below SELECTION GRID DISPLAY.
C. SELECT INVOICES TO BE UPDATED AS PAID
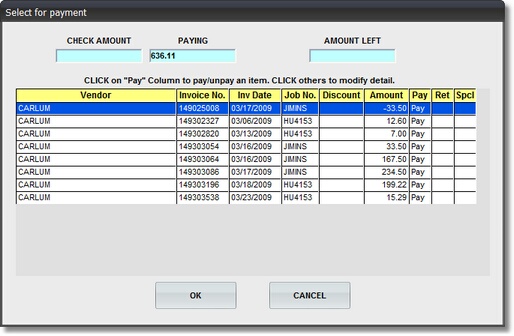
Except for the THREE DISPLAY BOXES at top and TWO BUTTONS at bottom, this DISPLAY GRID is exactly the same as that used the earlier SELECT INVOICES TO BE PAID step.
Here you will Click on Invoices until the Total in the PAYING AMOUNT Display Box at top center EQUALS the CHECK AMOUNT Display Box at top left.
The AMOUNT LEFT Display Box at top right can be useful if there was a mistake made when the Check was written and you need to make a PARTIAL INVOICE PAYMENT to make up the DIFFERENCE.
Double Click on the Invoice you want to partially pay, and enter the AMOUNT LEFT as the PARTIAL PAY AMOUNT.
The OK Button causes the SELECTED INVOICES to be UPDATED with CHECK # and DATE, and returns you to the Parameter Screen for further entry (IF Check Amount = Paying Amount).
The CANCEL Button takes you back to the Parameter Screen with NO UPDATE.

