|
G/L - TJS - Print Work in Process |

|

|

|
|
G/L - TJS - Print Work in Process |
|
|
|
On the General Ledger / Total Job Status Menu make
Selection #3 - Print Work In Process (WIP) .
This selection will print the WORK IN PROCESS REPORT.
A. Enter Parameters
1. PRINT THRU (Month End Date) (Required)
This is the ENDING CUTOFF DATE for inclusion of G/L Journal Records AND Current Period
Posted Transactions for this Report.
Any RECORD DATE LATER THAN THIS DATE is NOT included in the AMOUNTS PRINTED.
This date is normally a MONTH ENDING DATE for the Month you are CLOSING.
2. RESTRICT TO JOB RANGE (Optional)
Click on this Check Box if you want to RESTRICT PRINTING to a Range of Job Codes.
The FROM and THRU JOB CODE Input Boxes will appear. As you enter the FROM JOB you
will notice that the SAME CHARACTERS are entered in the TO JOB. If you're interested in
a SINGLE JOB, no further entry is required. If you want a RANGE of JOBS, overwrite the
THRU JOB CODE.
3. OPEN, CLOSED or ALL JOBS Selection (Required)
Use these Radio Buttons to select which Jobs you want included on this Report.
Closed refers to Jobs with a CLOSED DATE in the Total Job Status Record.
4. CREATE JOURNAL ENTRIES FOR OVER/UNDER BILLED Option
To CREATE JOURNAL ENTRIES for the NET OVER/UNDER BILLED (as an Adjustment to Sales)
Click in this Check Box. The Input Boxes below will appear on your Screen:
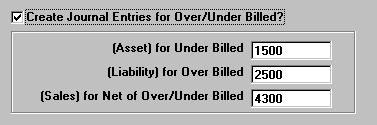
The ASSET ACCOUNT for UNDER BILLED is usuallly called COST IN EXCESS OF BILLINGS.
The LIABILITY ACCOUNT for OVER BILLED is BILLINGS IN EXCESS OF COST
The SALES ADJUSTMENT ACCOUNT is (OVER) - UNDER BILLINGS.
NOTE - If this Option is Selected you CANNOT Print to the Screen You MUST Print
to the PRINTER because this Report must become part of your AUDIT TRAIL,
since it affects your Financial Statements.
5. Windows Menu Selections
Click on this Menu at upper left if you need to have access to the Job Master File
or Chart of Accounts Master File Maintenance Programs.
B. Select Print Option Note: Click on FILES at top left for Printer / Font Setup
Use the buttons in the box at bottom to select Print Destination.
You can use the Start: Screen Button to print to the Screen for a Display LOOKUP
(If option 4 above has been selected, you cannot use this button).
Use the Start: Printer Button to a get a printed WORK IN PROCESS REPORT.
Use Exit to Return to the Menu without printing the Report.

