|
G/L - Print Trial Balance |

|

|

|

Print Trial Balance
On the General Ledger / Journal Entries and Statements Menu make
Selection #4 - Print General Ledger Trial Balance.
This selection will print the GENERAL LEDGER TRIAL BALANCE.
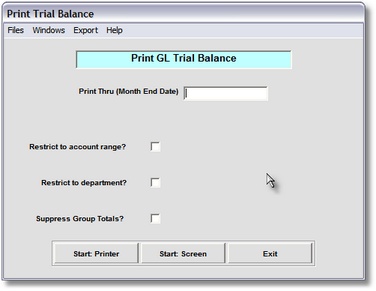
A. Enter Parameters
1. Enter PRINT THRU DATE (Required)
This is the CUTOFF DATE for inclusion of G/L Journal Records in this Report. Any RECORD
DATE LATER THAN THIS DATE is NOT included in the Report Totals. This date is normally
the MONTH END DATE for the Month you are CLOSING.
2. RESTRICT TO ACCOUNT RANGE Option
Use this Check Box if you want to RESTRICT THIS REPORT A RANGE OF ACCOUNTS
(perhaps just Expense Accounts). When checked, the FROM and THRU General Ledger
Account Input Boxes appear.where you can enter the Accounts you want included.
3. RESTRICT TO DEPARTMENT Option
Click on this Check Box if you want to RESTRICT THIS REPORT TO A DEPARTMENT,
set up in your Departments Master File. This is a Drop Down List Box. After Clicking the
Down Arrow you'll see all the Departments in your Master File. Click on the one you
want this Report for.
4. Windows Menu Selections
Click on this Menu at upper left if you need to CHANGE A CLASS OR GROUP NAME or
the position of its printing.
Class is determined by the ACCOUNT CLASS in the Chart of Accounts Master Record.
Class Description prints before the FIRST ACCOUNT of an Account Class
Group Name is entered in the Account Master Record of the FIRST ACCOUNT in this
GROUP. It can be removed and replaced as required.
The other file accessible from this Window Menu is the G/L Parameters Record. Here
you will find the LAST JOURNAL ENTRY NUMBER USED and FISCAL YEAR ENDING
MONTH.
5. Export Menu
Use this Menu Item if you want to EXPORT THIS REPORT TO A DISK FILE in de-limited
ASCII format, which can be accepted by most Word Processors and DATA BASES.
The selection will ask you for a Destination and Name. This is usually to your DISKETTE
DRIVE, with an 8 character name of your choosing followed by (dot)TXT.
After designating the Destination and Name you can then either Print to the Screen or
Printer, and your EXPORT DISK FILE will be created at the SAME TIME.
After making the Export selection you can Cancel it by Clicking on the EXPORT CANCELLED
Menu Selection.
B. Select Print Option Note: Click on FILES at top left for Printer / Font Setup
Use the buttons in the box at bottom to select Print Destination.
You can use the Start: Screen Button to print to the Screen for a Display LOOKUP.
Use the Start: Printer Button to a get a printed G/L TRIAL BALANCE.
Use Exit to Return to the Menu without printing the Report.