|
A/R - M/E - Print Statements |

|

|

|
|
A/R - M/E - Print Statements |
|
|
|
On the A/R and BILLING / A/R Month End Menu select #6 - Print Statements.
This selection will print the CUSTOMER STATEMENTS.
A. Enter Parameters
1. Enter STATEMENT DATE (Required)
This is the CUTOFF DATE for inclusion of UNPAID CUSTOMER INVOICES on this Report.
Any INVOICE DATE LATER THAN THIS DATE is NOT included in the Listed Invoices.
This date is normally the MONTH END DATE for the Month you are CLOSING.
2. PRINT ONLY THIS CUSTOMER Option
Enter a CUSTOMER CODE here if you want to RESTRICT THIS REPORT A SINGLE
CUSTOMER. Key the FIRST LETTER of the First Name if you don't know the Code
and SELECT THE CUSTOMER BY NAME from the Customer Scan For Window.
3. PRINT DUE DATE INSTEAD OF INVOICE DATE Option
Click on this Check Box if you want to print the DUE DATE in place of the INVOICE DATE
on the Customer Statements.
4. Windows Menu Selections
Click on this Menu at upper left if you need to CHANGE A CUSTOMER NAME OR ADDRESS,
or ALTER the Printing Characteristics of the Statement.
Click on the Customers Menu Selection to bring up the Customer Master File to alter Name
and Address.
Click on Statement Print Parameters to bring up the Print Control Window below:
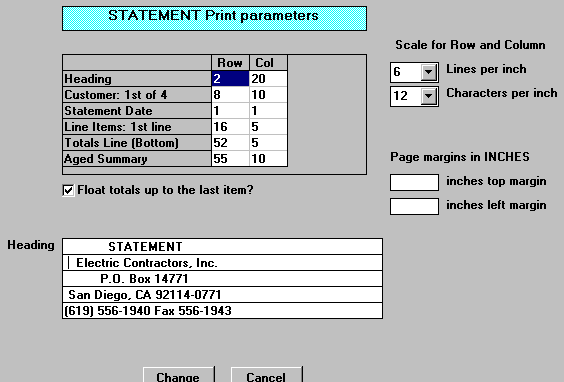
The ROW / COLUMN Grid at top center determines the STARTING PRINT POSITION of
all Sections of the Statement. Click on an Item to bring up a CHANGE WINDOW and enter
new positions as required.
The SCALES at right top are Drop Down List Boxes that contain choices of 6 or 8 Lines per Inch
for Vertical Spacing and 10 or 12 Character per Inch for Horizontal Spacing.
Below those are Input Boxes for Margin Sizes in Inches an fractions thereof.
The Float totals up to the last item Check Box will OVERRIDE the Totals Line positioning
in the Grid Display, and move the Totals and Aging up to a Position JUST BELOW the LAST
LINE PRINTED.
The contents of the Heading Boxes appear at the top center of each Statement.
B. Select Print Option Note: Click on FILES at top left for Printer / Font Setup
Use the buttons in the box at bottom to select Print Destination.
You can use the Start: PDF/Preview Button to print to PDF.
Notes on printing to PDF:
| • | Gives you a preview of the entire statement run in Adobe Reader. |
| • | Provides the capability to print an attractive statement form as shown below, without having to purchase special forms. |
| • | The PDF file is created in the <Accounting System Root>\data\Documents folder (for instance, "c:\AW7\data\Documents") with the name "Statements_YYYYMMDD.pdf", where YYYY is the 4-digit year, MM is the month and DD is the day. |
| • | You can also create your own logo to print in the header. |
| • | Your logo image file should be 200dpi, either jpeg or png format, with a maximum size of 290 pixels high by 550 pixels wide. |
| • | We recommend that the logo image file be stored in the <Accounting System Root> folder with the name "stmtlogo.jpg". It can be named anything you like, but a minor configuration change would have to be made to accommodate that. |
| • | The PDF files are searchable. |
| • | In fact, the entire folder wherever they are stored, is searchable by Adobe Reader, allowing you to look up specific statements by customer, date, or invoice number of an invoice on a statement. This gives you quick access to statement history and saves tons of filing space. |
| • | You would be able to store almost 400 million statements (we hope you have that many!) on one 500 gigabyte disk drive costing less than $100! |
After Clicking Start: Print, the FIRST CUSTOMER STATEMENT will print and the
Test Print Control Panel will appear.
Use Exit to Return to the Menu without printing the Statements.

Sample Statement in PDF Format (Print to Screen Option)

