|
P/Y - Q/E - Print Quarter Earnings Report |

|

|

|
|
P/Y - Q/E - Print Quarter Earnings Report |
|
|
|
On the Payroll / Payroll Quarter End Menu
select #1 - Print a Quarter Earnings Report.
The output produced is the QUARTER EARNINGS REPORT.
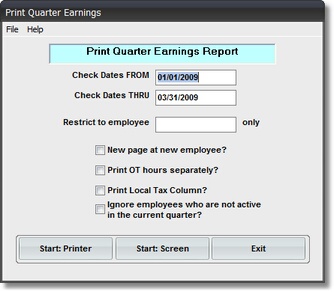
A. Enter Parameters
1. Enter CHECK DATES FROM (Required)
This is the BEGINNING CUTOFF DATE for inclusion of PAY CHECK Records in this Report.
Any RECORD DATE EARLIER THAN THIS DATE is NOT included in Report Amounts
or Totals.
2. Enter CHECK DATES THRU (Required)
This is the ENDING CUTOFF DATE for inclusion of PAY CHECK Records in this Report.
Any RECORD DATE LATER THAN THIS DATE is NOT included in Report Amounts or Totals.
3. RESTRICT TO EMPLOYEE ONLY Option
Use this Input Box if you want a Report for a Single Employee. If you don't know the Employee's
Code key the first letter of the LAST NAME and Press Enter. You can find the Employee's Name
in the SCAN FOR EMPLOYEE Window.
You would use this feature in the case of an Employee Earnings Lookup for UNEMPLOYMENT
CLAIMS. In this example the FROM and THRU DATES would not be a QUARTER, but the TIME
PERIOD requested by the Unemployment Examiners.
4. NEW PAGE AT NEW EMPLOYEE Option
Click on this Check Box if you want each NEW EMPLOYEE to START PRINTING on a NEW PAGE.
This is useful if you put copies of this Report in EMPLOYEE FOLDERS..
5. Print OT hours separately Option
Click on this Check Box if you want a SEPARATE COLUMN for OVERTIME Hours. If checked,
the Hours column will show Regular Hours. If unchecked, the Hours column will show total
hours worked.
6. Print Local Tax Column Option
Click on this Check Box if you have LOCAL TAXES WITHHELD and want a Column to print
that shows these tax amount totals for each employee.
7. Don't Print INACTIVE EMPLOYEES Option
Click on this Check Box if you want to EXCLUDE Employees from this Report who had
NO ACTIVITY during this Quarter.
B. Select Print Option Note: Click on FILES at top left for Printer / Font Setup
Use the buttons in the box at bottom to select Print Destination.
You can use the Start: Screen Button to print to the Screen for a Display for PROOF TOTALS.
(Be sure to do a PRINTED REPORT to get your AUDIT TRAIL Report).
Use the Start: Printer Button for a printed QUARTER EARNINGS REPORT
and Return to Menu.
Use Exit to Return to the Menu without printing the Report.

