|
P/O - Enter / Edit |

|

|

|
|
P/O - Enter / Edit |
|
|
|
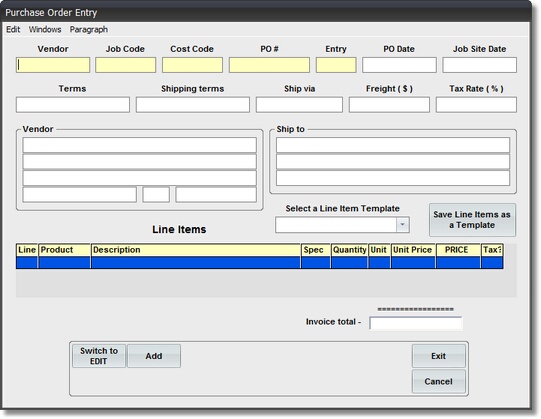
A. Getting Started This is a MASTER FILE EDIT PROGRAM
The PURCHASE ORDER MASTER RECORD is used to store information about
a Purchase Order that will allow tracking of its FULLFILLMENT and WARNING if
P.O. AMOUNT is EXCEEDED.
-------------------------------------------------------------------------------------------------------------
On the Accounts Payable Master Files Menu select #3 - Edit Purchase Orders.
The Master File Edit Input Screen will appear with the FIRST RECORD IN KEY
SEQUENCE in the File.
B. ADD a New Record
(Click on Switch to ADD button to Clear Record and enter ADD Mode).
1. Enter Job Code
Enter a VALID Job Code, then Click on Cost Code or Press TAB key.
You will see the Job NAME displayed in the VERIFICATION WINDOW.
ALL PURCHASE ORDER RECORDS MUST HAVE A VALID JOB CODE ENTERED.
If you are not sure of the Job Code, enter the FIRST LETTER (usually indicates
type of Job) Then Press TAB key to bring up SCAN FOR WINDOW.
If the Job Name is NOT IN THE LIST, you can ADD A NEW JOB by clicking on the
WINDOWS MENU BAR ,then clicking on the JOBS selection.
2. Enter Cost Code
Enter a VALID Cost Code, then Press TAB key.
You will see the Cost Code NAME displayed in the VERIFICATION WINDOW.
ALL TIME CARD ENTRY RECORDS MUST HAVE A VALID COST CODE ENTERED.
If you are not sure of the Cost Code, enter the FIRST 2 DIGITS (usually indicates
type of Work) Then Press TAB key to bring up SCAN FOR WINDOW.
If the Cost Code is NOT IN THE LIST, you can use JOB MAINTENANCE to add a
Cost Code by clicking on the WINDOWS MENU BAR
Another simpler way to Add a New Cost Code to a Job is to key in the full Cost Code
(It must exist in the Master File of Cost Codes). After pressing TAB you will see a
Message Box that asks if you want to ADD THIS COST CODE. If you press the YES
button the Cost Code will be added & a Message Box will verify it.
3. Enter Purchase Order Number
This is your internally generated PURCHASE ORDER NUMBER to identify this
Purchase Order on this Job. Normally it is a unique number, in sequential order,
and Preprinted on the Purchase Order Form.
4. Enter Vendor Code
This code identifies the Vendor or Subcontractor with whom the order was placed.
5. Description and Dates
These are optional fields for information purposes; Description, Date Ordered and
Date Expected.
6. Enter Purchase Order Amount
This is the CURRENT AMOUNT OPEN on this Purchase Order.
C. CHANGE an Existing Record
1. Find the Record you want to change.
Use the GO FIND button to bring up the FIND Screen. After locating the Record you
want to change, click on it. The Find Screen will disappear and the selected Record
will be on the Screen.
2. Highlight the Information you want to Change or Remove.
Use the Mouse to place the Cursor in an empty field, or drag it across information
you want to Change or Remove..Press the Delete key to Remove data or key in the
the new data to add it to an empty field, or replace highlighted data.
3. Exit or Move to another Record.
When you leave the UPDATED Record to EXIT to the Menu or GO TO ANOTHER
RECORD, the Record you Changed is AUTOMATICALLY STORED.
D. DELETE an Existing Record
1. Find the Record you want to DELETE.
Use the GO FIND button to bring up the FIND Screen. After locating the Record you
want to DELETE, click on it. The Find Screen will disappear and the selected Record
will be on the Screen.
2. Click on DELETE OFF button .
You will now enter DELETE MODE which causes the DELETE BUTTON to appear
and TURNS ON the Delete Function. VERIFY THAT THE RECORD ON THE SCREEN
IS THE ONE YOU WANT TO DELETE. Then click the Delete button to Remove it from
the File.
After Deleting all selected Records Click DELETE ON to Disable and Remove the
Delete button. This protects you from accidentally deleting a record.

