|
A/P - Pay - Print Aged A/P Report |

|

|

|
|
A/P - Pay - Print Aged A/P Report |
|
|
|
On the Accounts Payable / A/P Payments Menu select #1 - Print Aged A/P Report
This selection will print the AGED ACCOUNTS PAYABLE REPORT.
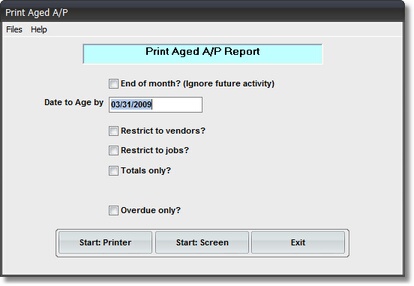
A. Enter Parameters
1. END OF MONTH Check Box
Click on this Check Box to IGNORE FUTURE ACTIVITY (for a month-end cut-off, to balance to the General Ledger).
The MONTH that you enter in the DATE TO AGE BY Box will be considered the MONTH ENDING. Any Invoices with an ACTIVITY DATE LATER THAN THAT MONTH will be ignored and not included on this Report.
To VERIFY this MONTH END AGED A/P REPORT, take LAST MONTH'S Report , and ADD ALL INVOICE REGISTER TOTALS from the Current Month, then SUBTRACT ALL A/P CHECK REGISTER TOTALS. This should match the Grand Total on this Report.
2. Enter DATE TO AGE BY.
This is the Date which will be COMPARED to the DUE DATE to determine the AGE COLUMN in which this Invoice Amount will appear. Normally the CURRENT DATE is entered here, sothat you can see the CURRENT STATUS of your Aged Accounts Payable.
If this is a MONTH END BALANCING REPORT, enter the MONTH END DATE for the Month being reviewed. Use the LOOK IN HISTORY Check Box described below if there has been a MONTH END RUN since that Month End Date.
3. Restrict to Vendor (optional)
Enter a VENDOR CODE in this Input Box if you want to restrict the Invoices on this Report to JUST ONE VENDOR.
4. Restrict to Job (optional)
Enter a JOB CODE in this Input Box if you want to restrict the Invoices on this Report to JUST ONE JOB.
5. TOTALS ONLY Check Box
Click on this Check Box if you DO NOT want INDIVIDUAL INVOICES to print, ONLY VENDOR TOTALS.
6. LOOK IN HISTORY Check Box (only APPEARS if END OF MONTH has been Checked)
Check this Box if there has been a MONTH END RUN SINCE the Month End Date you are balancing to. If so, then the PAID Invoices will have been moved from the OPEN A/P FILE to the A/P HISTORY FILE.
You will also get a MESSAGE BOX WARNING:
"The DATE is in a closed month. CONTINUE?"
If you get this Message be sure to verify that this LOOK IN HISTORY Box has been Checked if it is visible.
B. Select Print Option Note: Click on FILES at top left for Printer / Font Setup
Use the buttons in the box at bottom to select Print Destination.
You can use the Start: Screen Button to print to the Screen for a Display LOOKUP.
Use the Start: Printer Button to a get a printed AGED A/P REPORT.
Use Exit to Return to the Menu without printing the Report.

