|
Summary & Performance |

|

|

|
|
Summary & Performance |
|
|
|
On the Job Cost / Job Cost Reports Menu
select #4 - Print Job Cost: Summary by Line Item
The output produced is the JOB COSTS: SUMMARY BY LINE ITEM Report.
A. Enter Parameters
1. Enter PRINT THRU DATE (Required)
This is the CUTOFF DATE for inclusion of Detail Cost Records in this Report. Any RECORD
DATE LATER THAN THIS DATE is NOT included in Report Amounts or Totals. Record
Dates are listed below:
Labor Cost - CHECK DATE (unless next parameter is Checked)
Cost from Accounts Payable - ACTIVITY DATE (date posted to Accounts Payable)
Billings - ACTIVITY DATE (date posted to Accounts Receivable)
Receipts - DATE PAID
2. USE PWE DATE FOR LABOR Option
Use this Check Box if you want the LABOR RECORD DATE to be the PERIOD WEEK ENDING
DATE instead of the CHECK DATE, as above.
In the case of Pay Weeks that straddle a Month End, this will include MORE LABOR COST,
which was actually PERFORMED in the Month indicated, but since the CHECK DATE was
in the FOLLOWING MONTH, these Report Totals will NOT BALANCE to the General Ledger,
where JOB LABOR COST, like ALL PAYROLL ACCOUNTING is based on CHECK DATE.
3. NEW PAGE AT NEW JOB Option
Click on this Check Box if you want each NEW JOB to START PRINTING on a NEW PAGE.
This is useful if you are distributing Job Cost Reports to different Job Sites.
4. COST CODE DIVISION BREAK Option
Use this Check Box if you want SUBTOTALS BY COST CODE GROUP. There are TWO BREAK
OPTIONS in this Drop Down List Box, 1 and 2. The NORMAL DIVISION BREAK is 2. Selecting
this option will give you SUBTOTALS for:
01 - General Conditions
02 - Sitework
03 - Concrete
(etc.)
The 1 Division Break will give you Subtotals only when the FIRST DIGIT of the Cost Code
changes. This can be useful for some Specialized Cost Code setups.
The 0-none selection is used to REMOVE a prior selected Subtotal Break.
5. SELECT JOBS
The DEFAULT PARAMETER is All Jobs. You may select JOB CODES FROM and
THRU by clicking on Select From and Thru, then entering the JOB CODES in the Input
Boxes that appear at right.
You may also select up to NINE INDIVIDUAL JOBS to print by choosing Select Each Job.
After Clicking this Option the Nine Input Boxes and Clear All Jobs Button will appear at
right. Since these Parameters are held in memory, the Clear Button is handy to remove
prior selections.
6. IGNORE CLOSED JOBS Option
Use this Check Box if you want to SKIP PRINTING any Jobs that have a DATE CLOSED
entered. (This option is not available when you choose the Select Each Job option above).
B. Enter JOB PERCENTAGES (Optional)
To bring up the EDIT UNITS and PERCENT COMPLETE Entry Screen, Click on the Job
Percentages Menu Item at top left. An empty Screen will appear with the Cursor on the
Job Code Input Box.
To bring up a JOB, enter the Job Code, then Click on Load Job Button.
The window below will appear:
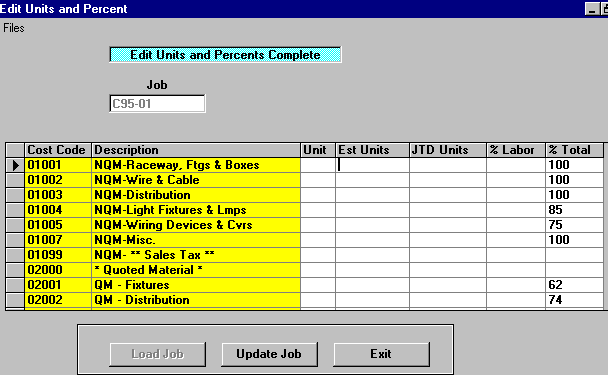
Use the above Grid Display to DIRECTLY ENTER percentages of ACTUAL WORK COMPLETE in the
TOTAL % Column at far right. Just Click on the box for the Line Item you want to update and enter the %.
After entering all Cost Codes for this Job, Click on Update Job Button and Job files will be updated.
C. Select Print Option Note: Click on FILES at top left for Printer / Font Setup
Use the buttons in the box at bottom to select Print Destination.
You can use the Start: Screen Button to print to the Screen for a Display LOOKUP.
Use the Start: Printer Button to a get a printed JOB COST REPORT.
Use Exit to Return to the Menu without printing the Report.

