|
AIA - Billing |

|

|

|
|
AIA - Billing |
|
|
|
There are 4 steps that are used in the AIA BILLING Process:
1. Print a REQUEST SHEET for recording CURRENT AIA BILLING ACTIVITY
2. Enter this Activity using ENTER AN APPLICATION tools.
3. Print an INTERIM APPLICATION & CERTIFICATION FOR PAYMENT for submission.
4. After ACCEPTANCE print a FINAL APPLICATION & CERTIFICATION FOR PAYMENT
and UPDATE the AIA MASTER FILES and ACCOUNTS RECEIVABLE INVOICE INPUT FILE.
5. OPTIONALLY, Print an A/R Invoice Register and Update the Open Accounts Receivable File.
=============================================================================
On the A/R and BILLING/ AIA Billing Menu
select #2 - AIA Billing
1. Print a REQUEST SHEET
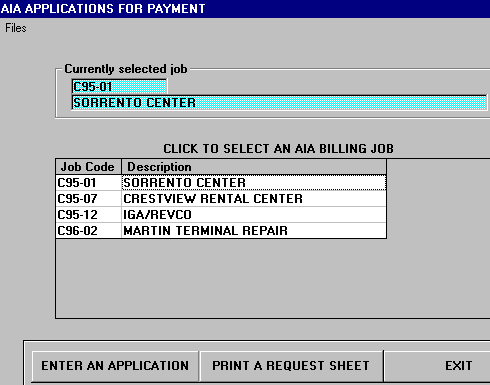
This is the MAIN AIA BILLING CONTROL PANEL. From the Grid List of AIA JOBS you can
select the Job you want to PRINT A REQUEST SHEET FOR. ( You also use this same
Control Panel to Start ALL OTHER AIA BILLING Functions).
The CURRENTLY SELECTED JOB shows in the Blue Boxes at top. To change the Job
Click on a Job in the Selection Window.
To Print an AIA REQUEST SHEET, Click on the PRINT A REQUEST SHEET Button.
The example printed below was given to the Project Manager and returned with the
Next Application's values.
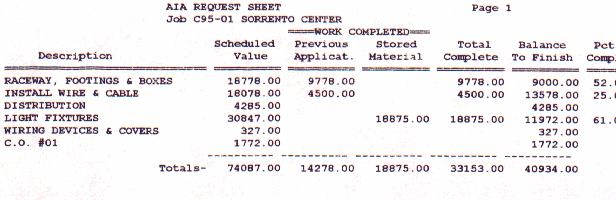
This LEFT SIDE of the Report gives all the Financial Information on the STATUS OF LINE ITEMS as of
the LAST BILLING APPLICATION. The Project Manager sees immediately what HAS BEEN BILLED,
and what is LEFT TO BE BILLED.(Last column at right, not shown, is Percent Complete).
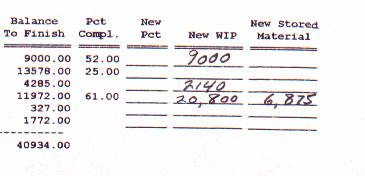
This right side of the Report has the NEW APPLICATION VALUES
entered by Project Management.
2. ENTER AN APPLICATION
Use the above sheet to enter the VALUES for the NEXT APPLICATION. From the MAIN AIA
Control Panel, pictured above, Select the Job from the Grid, then Click on the ENTER AN
APPLICATION Button. The APPLICATION SELECTION Grid Display below will appear:
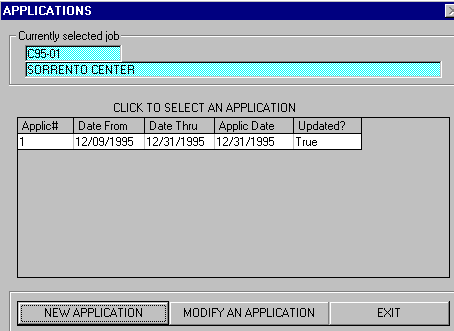
This Screen shows that there was PREVIOUS APPLICATION and that it WAS UPDATED.
To Enter a NEW APPLICATION Click on the NEW APPLICATION Button. The APPLICATION
HEADER Form below appears next:
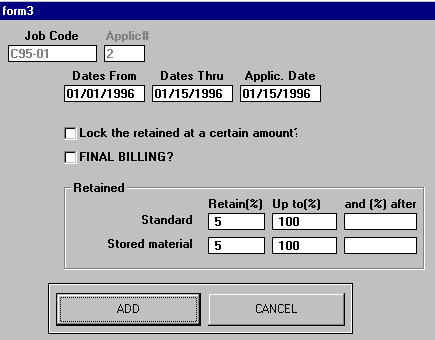
In this Form you MUST ENTER the APPLICATION DATES THRU and Application
Date for Billing (if different).
Changes to Retainage can be made on this Form. After Clicking on the ADD Button
you'll see the MAIN PAYMENT APPLICATION Grid Display pictured below:
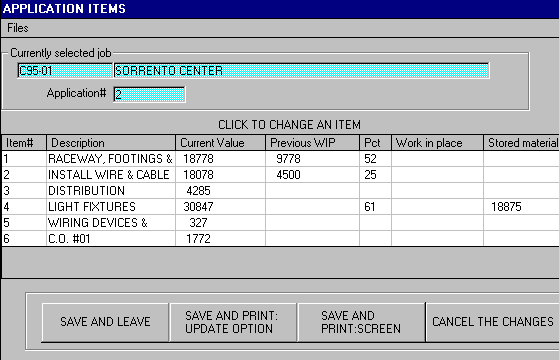
The Numbers in this Grid Display EXACTLY MATCH the Numbers printed on your Request Sheet
(The STATUS of the Billing AFTER the LAST PAYMENT APPLICATION). Now you can Click on the
Line Items you want to enter values for and use the Line Item Entry Form pictured below:
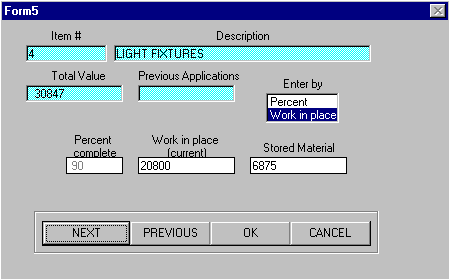
There are TWO POSSIBLE ENTRIES IN THIS ENTRY WINDOW and ONE SWITCH.
The Switch is Enter by Percent or Work in Place $'s.
If highlight is on W.I.P. $'s then Entries are Work in Place (current) and Stored Material.
The Percent Complete is dimmed and is DISPLAY ONLY.
REMEMBER THAT WORK IN PLACE $'s are for the CURRENT PERIOD while Stored
Material is the TOTAL DOLLARS OF STORED MATERIAL ON THE JOB SITE.
If highlight is on Percent then Entries are PERCENT COMPLETE JOB TO DATE.
Work in Place $'s are dimmed and for DISPLAY ONLY. Do not use this Option
if you have Stored Material on this Line Item.
Buttons at bottom of Window allow you to Scroll Forward and Backward through the
Line Items (NEXT - PREVIOUS), return to the Line Item Selection Screen (OK), and to
leave without making any changes (CANCEL).
After ALL Line Items have been entered, Click on OK and you will have your Print and Update
options available.
3. Print an APPLICATION & CERTIFICATION FOR PAYMENT

As you can CONFIRM in the Grid Display above all required entries have been made and the
NEW VALUES are DISPLAYED ABOVE. You have the following Options:
SAVE AND LEAVE Store the CURRENT ENTRIES and Return to Application Selection
(Stores ONLY the Entries, DOES NOT UPDATE AIA Files)
SAVE AND PRINT: UPDATE OPTION Store as above and PRINT the REPORT with OPTION to
UPDATE AIA and Accounts Receivable Files.
SAVE AND PRINT: SCREEN Store as above and PRINT the REPORT to the SCREEN with
NO OPTION TO UPDATE AIA and Accounts Receivable Files.
CANCEL THE CHANGES Return to Application Selection Window WITHOUT SAVING the
CURRENT ENTRIES.
To Print your Report Click on the SAVE AND PRINT: UPDATE OPTION Button, and FORMS G-702 and
G-703 will Print. Before printing you will have a chance to enter the NUMBER OF COPIES you want
printed.
4. UPDATE the AIA MASTER FILES and ACCOUNTS RECEIVABLE INVOICE INPUT FILE
After Printing you will see a MESSAGE BOX with an OPTION TO UPDATE THIS APPLICATION.
Click on Yes if this is a FINAL PRINTING of an ACCEPTED BILLING. Both the AIA MASTER FILES
and the ACCOUNTS RECEIVABLE INPUT FILE will be UPDATED, and a Message Box will CONFIRM
this.
5. Print an A/R Invoice Register and Update the Open Accounts Receivable File (optional)
After entering and updating ALL AIA BILLINGS in a run, you should go to Accounts Receivable
and do the PRINT AND UPDATE INVOICES step to post the AIA Billings to the Open Accounts
Receivable File.

