|
A/R - M/E - Create Interest |

|

|

|
|
A/R - M/E - Create Interest |
|
|
|
The Purpose of this Menu Selection is to AUTOMATICALLY compute and post INTEREST
ON PAST DUE BILLINGS.
The DATE USED to cause Interest to be Computed and the Interest Rate are Parameters of
this Program. In the CUSTOMER MASTER RECORD there is an Option to COMPUTE INTEREST
on PAST DUE BILLINGS. Using these tools the System can SELECTIVELY and FLEXIBLY apply
Interest as required.
Also, INTEREST CAN BE REMOVED easily during the ENTER CASH RECEIPTS Step on the
A/R - Enter Current Activity Menu.
On the A/R and BILLING / A/R Month End Menu select #3 - Create Interest on Past Due Invoices.
This selection will print the A/R INTEREST COMPUTED REPORT.
The Parameter Screen below will appear:
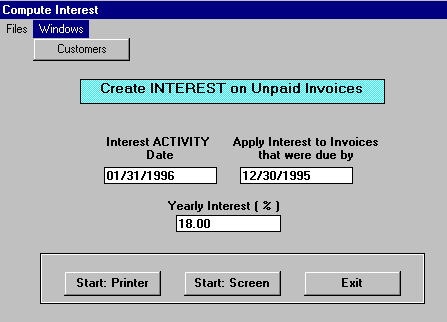
A. Enter Parameters
1 .INTEREST ACTIVITY DATE (Required Entry)
This date controls the POSTING of Interest Charges to the Open A/R and General Ledger.
Enter the Current Month End Date here.
If you enter a date in a CLOSED MONTH you will get a Message Box WARNING.
You CANNOT enter a Date in a Closed Month.
2. APPLY INTEREST TO INVOICES THAT WERE DUE BY (Required Entry)
This Date controls HOW MUCH PAST DUE an Invoice has to be to get Interest computed
on it. Management policy will determine how FAR BACK this date will be.
3. YEARLY INTEREST (%) (Required Entry)
This is the YEARLY INTEREST RATE for Interest Computation on Past Due Invoices.
Enter as a WHOLE NUMBER with decimals if necessary (18 percent = 18). The Program
will first compute a MONTHLY INTEREST RATE, before computing the Interest Amount.
4. Windows Menu Selection
Click on this Menu at upper left if you need to have access to the CUSTOMER Master File.
Here you can CHANGE THE INTEREST CHECK BOX to INCLUDE or EXCLUDE any Customer
from this Computation and Report.
B. Select Print Option Note: Click on FILES at top left for Printer / Font Setup
Use the buttons in the box at bottom to select Print Destination.
You can use the Start: Screen Button to print to the Screen for a Display for PROOF TOTALS.
(Be sure to do a PRINTED REPORT to get your AUDIT TRAIL Report).
Use the Start: Printer Button for a printed A/R INTEREST COMPUTED REPORT
and OPTION TO UPDATE the Open Accounts Receivable File.
To leave WITHOUT Printing a Report click on Exit.
C. UPDATE Open Accounts Receivable
After the A/R Interest Computed Report has been printed you will see the UPDATE OPTION
Window below:
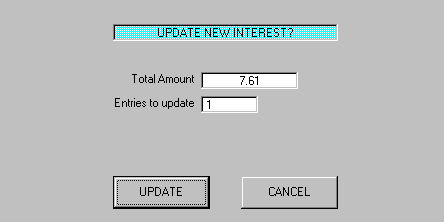
The TOTAL AMOUNT in the top display box should be the GRAND TOTAL from your
Report.
The ENTRIES TO UPDATE is the Number of INTEREST TRANSACTIONS that will be
posted to your Open Accounts Receivable File.
The CANCEL button will Return you to the Menu with NO UPDATE of the Open A/R File.
The UPDATE button will UPDATE THE OPEN ACCOUNTS RECEIVABLE FILE and
Display a Message Box to verify it. After Clicking OK, you'll Return to the Menu.

